Solving Rubik’s cube in DecisionRules
DecisionRules is a versatile business tool capable of dealing with complex tasks. To illustrate this, we are presenting a DecisionRules Rubik's cube solver!


Over the past few months, DecisionRules has become a very powerful, versatile business tool that can easily solve complex tasks and is applicable in a wide range of different areas. You are only limited by your imagination. To support this idea, we have prepared an article on solving Rubik's Cube in DR.
Do you really know what the Rubik's cube is?
Today, the Rubik's Cube is known as the world's best-selling puzzle, but it used to be nothing more than a way to understand relationships in three-dimensional space. It consists of 6 sides. Each side has 9 faces of the same color. The main idea is to bring the cube back to its solved permutation (combination). By scrambling this combination puzzle, over 43 quintillion permutations can be created.
If you tried to blindly assemble the Rubik's cube, it would take a LOT of time. That's why we use algorithms for faster solutions. There are many methods for solving the Rubik's cube, such as ROUX, ZZ or CFOP. These are different methods, but the idea is the same. We solve the Rubik's cube by dividing it into subsets. Then we solve each subset in succession.
The CFOP algorithm
In our case, we decided to solve the Rubik's cube in DecisionRules using the CFOP method. The CFOP method is the most widely used solving method worldwide and ranks first in the world’s fastest solve done by a human, so if you want to learn how to solve the RC on your own, you can definitely do it with DecisionRules.
To understand how we implement this method in the DR system, we need to take a closer look at how the CFOP method actually works. CFOP stands for "Cross, First two layers, Orientation of the last layer, Permutation of the last layer". Each character represents one phase that solves a different part of the cube. So the first step will be to create four rules, each rule representing an individual phase.
Rubik's Cube Solution
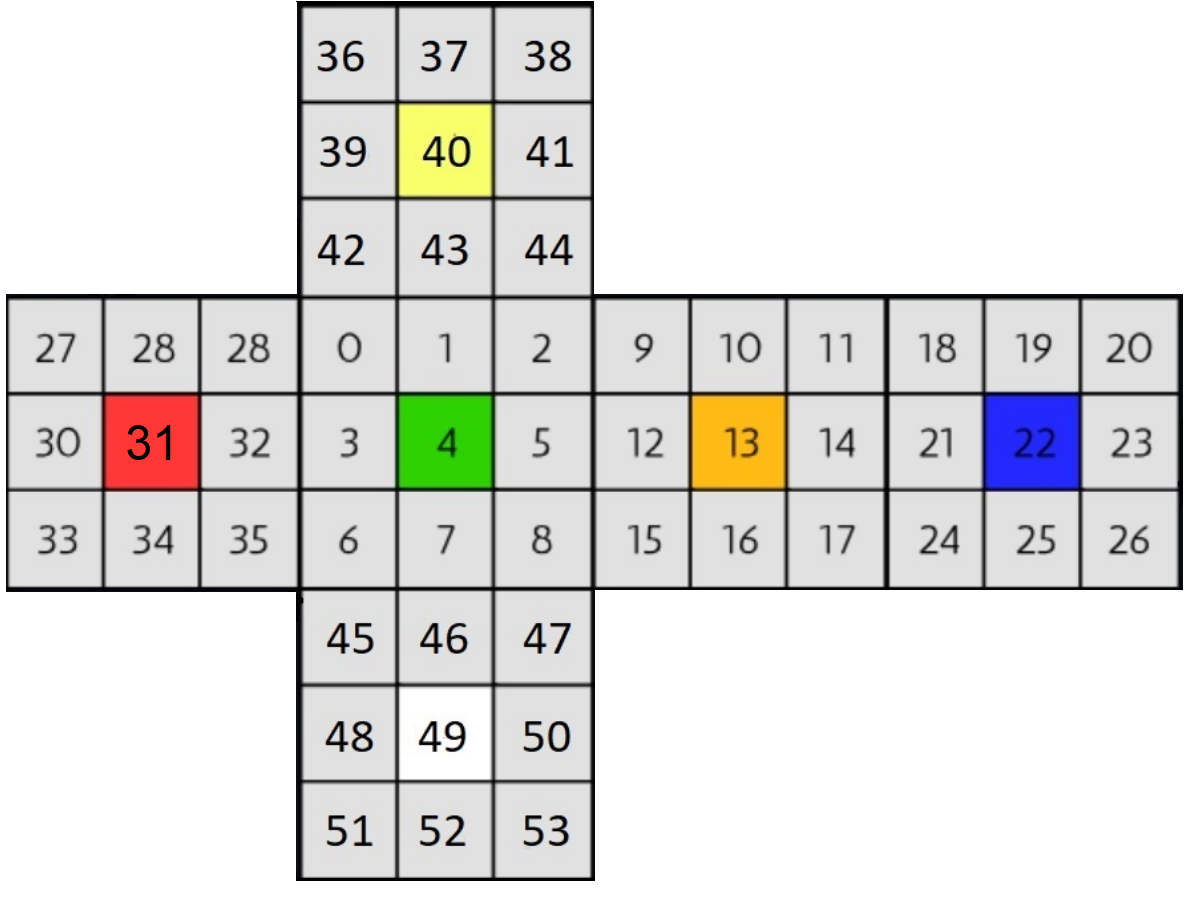
Now we have to solve each phase after another, but first, we have to assess the current state of the cube as input and work with it. For this reason, we need to create a notation so that we know exactly what piece we are working with and what color is above it. An example of our RC notation can be seen below.

As you can see, we have divided our cube into 54 integers, each representing one face. We take all this information and create a sample string of the current state of the cube.
0 1 2 3 4 5 6 7 8 9 10 11 12 13 14 15 16 17 18 19 20 21 22 23 24 25 26 27 28 29 30 31 32 33 34 35 36 37 38 39 40 41 42 43 44 45 46 47 48 49 50 51 52 53
This chain represents a solved cube. The integers in the string look ordered, this is because this string hides two pieces of information about the cube: firstly, there is an order of numbers from left to right representing the reference positions starting from 0 to 53, which are incremented by one for each white space, secondly, there are the names of the faces that are below the reference positions. Look at the number 4 in the string, what you see is the name of wall 4, wall 4 is the fourth number from the left, so the reference position is also 4. When the names of all the walls match their reference positions, the cube is solved.
Now that we know how to read information about the current state of the cube, we need to think about how to tell the user what moves to make next. Therefore, we will use the official Rubik's Cube notation. This notation tells which side should be rotated in which direction.
We've understood what the input and output should look like, now it's time to create the phases.
The Cross (C)
At this phase we will orient all the white edges around their center, when finished they will look like a cross. We will solve this part using four rules.
- first rule checks for interrupting combinations (in this case when two or more edges are oriented correctly only to one center)
- second checks what edge we are currently working on.
- third recalculates position depending on the second table
- fourth solves one edge
The First Two Layers (F2l)
F2L is solved one slot at a time using four rules. (slot is a pair of edges and corners)
- first rule checks for slot rotation
- second recalculates position depending on first rule
- third checks for interrupting combinations (like in Cross)
- fourth solves one slot
Why do we call interrupting combinations the third rule and not the first rule as in the first phase?
This is because Cross has only a few permutations in interrupting combinations, so we don't have to recalculate the position so early (better performance).
Orientation of the last layer (OLL)
At this stage, we will solve all the surfaces around the yellow center. To do this, we will use three rules.
- first rule checks for interrupting combinations
- second orients yellow edges
- third orients yellow corners
This time there is no need to recalculate the position because there are far fewer permutations than in F2L or Cross.
Permutation of the last layer (PLL)
For the last part, we need to solve the “Permutation of the last layer” or “PLL”, using only two rules
- first one solves corners
- second one solves the edges
After creating all these rules, it's time to edit everything in the scripting rules and bring them to life with a single rule flow.
Now we have recreated the CFOP in DecisionRules, but we have no way to visualize our RC, so we have to choose a 3D engine, in our case Unity. After selecting a 3D engine and recreating the RC in it, we need to somehow link the DR to Unity. Fortunately, this is no problem thanks to the Rest API.
Rest API usage and features
How does the Rest API work with DR? Our first step is to import the DR nugget into Unity, then just generate the .NET code example from the DR Test bench. Make sure to choose the correct rule flow before copying the code. Thanks to Test bench we don't have to worry about any additional coding, simply paste our code example into Unity, submit the current cube state as a string and watch the magic happen!

A high-level example of how DR communicates with Unity.
Summary
As you can see, DecisionRules have become a powerful tool for solving complex problems like solving a Rubik's Cube (which has over 43 quintillion possible permutations), and they're getting more powerful each and every day.
Thank you for reading!


